Kamis, 31 Maret 2011

Dreams are illustrations... from the book your soul is writing about you.


The summer before my junior year of high school I was rudely and abruptly relocated from Pennsylvania to Connecticut.    I was forced to leave behind my friends, most of whom I had known since early childhood. 

I was taken away from the only home I had ever really known . . . a Swiss chalet in the middle of the beautiful countryside of dairy farms and corn fields surrounded by the mountains of the Alleghenies.    


I was moved to high-rise apartment building in a coastal town near New Haven, Connecticut  . . . thrust from rural solitude to urbanity.  The sweet smell of mountain air was replaced by salty sea air.    The caw of crows to the screech of seagulls.


I went to a new school.  Culture shock?  Yeah.  Kind of.  I would have graduated with a class of about 30 students . . . that’s NOT a typo.  . . THIRTY students to a class of hundreds.  An unquestionable contrast, to be sure.

I can honestly say that I did not make or attempt to make a single friend at my new school during my Junior and Senior years.  I didn’t overly see the point.   I couldn’t relate to them and they couldn’t relate to me.  I went to school, did my time and went home.  I can barely even recall my graduation day . . . I felt like an anonymous being in a sea of strange faces.  I was glad to have graduated but it wasn’t a special moment for me. I can’t say I’m bitter, exactly, but I wonder how my life might have been different. 


__________________

I've had a similar themed dream that’s recurred for years and years.  In all of them I’m older than my high school years but I’m still in school because I haven’t graduated yet. In my dream I know that I’m an adult and have a job, a family of my own.  Sometimes that works into it as a reason why I haven’t graduated . . . because I can’t work AND go to school at the same time and I have to work because I have a household to support.  

I often can’t find my locker and if I do I can’t remember the combination to get into it.  I often seek the help of the school office and I’m unable to get help.   Once or twice I managed to get into the locker but nothing I needed for school was in it.    Other times I can’t  locate what classroom I’m supposed to be in or can’t remember my class schedule and I don’t know where I’m supposed to be.  But I never finish with school.

It recently occurred to me the reason I have this dream.  It’s because I never did graduate with THEM . . .  the kids I grew up with.  The kids I should have graduated with; the ones who would have made the experience meaningful and memorable. 

Unfortunately, this conflict will never be resolved.  It’s impossible.  Though, I wonder with my realization, if the dreams will persist.

__________________


This post isn’t a random thought that popped into my head . . . much like a lot of them are.  This one was inspired by, ironically, a dream I recently had.  This dream, also, ironically, had to do with a class reunion at the school with the people I never graduated with. 

Like I said, I was at this class reunion.  Except that for some reason it was a reunion for multiple graduating classes . . . including my sister’s class that was two years ahead of mine.  In the dream my sister was being a total bee-otch which reminded me of why I hated her so much when we were kids. 

Anyhoo, the dream itself isn’t important.  What is notable is the way it ended. 


At the end I was yelling . . . nay screaming . . .  at my sister.  I woke myself up yelling out loud, “. . . you ugly f*cking b*tch!”

Hehe . . . I remember laughing then thinking to myself, “boy, I hope I remember this in the morning” (obviously I did!) and the promptly falling back to sleep.

It’s scary the crap flying around inside my head.   The recipe that follows has absolutely nothing to do with anything other than that it's an oddball combination that's really quite good! 
_______________________

 Grape Jelly Meatballs

  • 2 Lb. Hamburger
  • 1 C. Bread Crumbs
  • 1/2 C. Milk
  • 2 Eggs
  • 2 Tbsp. Parsley Flakes
  • 2 Tsp. Salt
  • 1 Tsp. Pepper
  • 1 Tsp. Worcestershire Sauce
  • 1 (12 Oz.) Bottle Chili Sauce
  • 1 (16 Oz.) Jar Grape Jelly


Mix ingredients together.  

Make small meatballs. 

Brown and bake at 350 degrees for 35 minutes.

Add meatballs to a large sauce pan.  

Add jelly and chili sauce.  

Bring to a boil.  Reduce to simmer and cook meatballs in sauce 1 hour.


Rabu, 30 Maret 2011

Countless number of people have eaten in my kitchen and gone on to lead normal lives


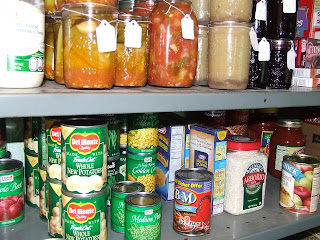
I have a fairly well stocked “pantry” . . . it’s not a pantry per se but shelves in the basement dedicated to food storage . . . close enough.  It’s not as organized as I’d like . . . but that’s the way it goes.

The staples for my pantry are sugar, flour, white rice, honey, salt, dry pasta, dried/canned meat, coffee beans, dry beans, canned milk, water, vinegar, canned vegetables, and ramen noodles.  We have other foodstuff on hand as well; canned pasta in sauce, canned chili, boxed macaroni and cheese . . . foods that I can make a quick meal out of.   But the staples are the things my pantry is never without and for good reason.  These items have a very long or forever shelf life.   That’s right . . . I said forever.  If stored in airtight containers and in cool, dark places they can last indefinitely.

E

ven the foods I keep on hand because they have a very long shelf life have expiration dates stamped on them.  Why?  They are often there to protect the manufacturer against lawsuits.  Did you know that there is no set standard of regulations for the use of expiration dates?

A good rule of thumb is that if it’s moldy, smells bad, tastes funny, or you’re just not sure then don’t eat it. 


Do not consume canned goods that are dented, bulging, rusty, leaky, that have broken seals, or that spurt when opened.

Take this information for what it’s worth . . . I’m not claiming to be an expert.  However, I’m happy to say that I haven’t died or killed anyone with food poisoning.


_________________________________________________________

Growing up I have fond memories of my mom canning fruits and vegetables.  It was quite a production . . . sterilized jars, pots of boiling water, food in various stages of preparation. 

One time when she was canning pears my stepfather arrived home from a fishing trip with his catch.  He needed to clean the fish so he appropriated some counter space and the small rinse sink for the purpose.  He scaled and gutted and filleted then packaged up the fish for the deep freezer.

Several months later when my mom opened up a can of those carefully canned pears she was shocked at what was staring up at her  . . . a fish eyeball floating at the top of the pears.  Ugh!

She went to the pantry and threw away everything she had canned on that date.  Lord knows what other offal had managed to make its way into those jars.

Again I say . . . ugh!

_________________________________________________________


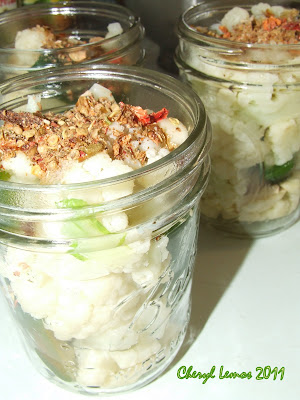
Hot Pickled Cauliflower

  • 1 Head Cauliflower
  • 4 JalapeƱos, Cut In Half Lengthwise
  • 8 Cloves Garlic, Smashed
  • 4 C. White Vinegar
  • 3 Tbsp Pickling Spice
  • 1 Tbsp Red Hot Pepper Flakes


Wash cauliflower, break into flowerets.  Place in a pot of water.  Bring to boil and simmer for 3 – 4 minutes.  Drain and cool.

Bring vinegar to a boil. Add pickling spice and simmer for 5 minutes.

In the meantime add cauliflower, jalapeƱos, garlic and hot peppers flakes to pint jars. 

Fill with boiling hot liquid. Seal. Refrigerate or process in a boiling water bath for 10 minutes if storing on shelf.  Makes 4 pints.


Selasa, 29 Maret 2011

Toire no Hanako-san


One of the women that used to watch after me when I got out of school once told me a story that remains with me to this day.  I can’t recall the whole tale but I remember the lasting effect it had on me.  The story was something about a witch who haunts the toilet and reaches up and grabs you as you’re using the potty.    Throughout my youth and sometimes to this very day I have check the toilet bowl to make sure there’s not a scraggly hand lying in wait to seize my unsuspecting bottom. 


The Japanese legend of Hanako-san is a similar tale of terror of the toilet.  It’s a story of a menacing young girl that haunts school restrooms, terrorizing little schoolgirls all across Japan.  It is one of the most famous ghost stories known as Toire no Hanako-san  or Hanako of the toilet .  Hanako is frequently found  haunting the third stall in the restroom on the third floor . . .  the girls' room . . . of a school.

Like most stories, there are versions, but in most she remains inactive unless provoked; when a silly little non-believer taunts her by knocking on her stall door three times and calls her name. 
 
"Are you there, Hanako-san?"

"Hai, I am here."  
If the girl is brave enough, she will open the door. But then Hanako-san will pull her into the toilet.

The story gained the status of an urban legend in the 80’s but rumors of Hanako’s damp porcelain existence began more than thirty years before that.  It is believed that Hanako-san is the ghost of a WWII-era girl who died in a bombing raid on the school while she was playing hide-and-seek.

If left alone, Hanako-san is harmless and can be avoided simply by staying away from her hiding spot.


_________________


Okonomiyaki . . . Japanese Pizza . . . yeps they even have pizza there.  It’s not quite the same as what we call pizza in the United States . . .  in Japan, it often takes some strange forms.  More like a pancake with toppings like rice, seaweed, squid, cod roe. 


There’s even Pizza Huts in Japan . . . you can get a napoorio with a  thin crust, pahn pizza ehm saizi, pahn pizza eru saizi or a cheezu crusto.  They can be made with the more familiar Pizza Hut toppings plus the odd things that the Japanese like to eat. 


_______________________


Pizza Dough Recipe

This is THE best pizza dough recipe I've used . . . it's now my standard for pizza dough!

4 1/2 Cups Unbleached Bread Or All-Purpose Flour
1 3/4 (.44 Ounce) Teaspoons Salt
1 Teaspoon Yeast
1/4 Cup (2 Ounces) Olive Oil
1 3/4 Cups Water, Ice Cold (40°F)
Cornmeal for Dusting


Stir together the flour, salt, and instant yeast in a 4-quart bowl.  

With an electric mixer, mix on low speed with the paddle attachment, stir in the oil and the cold water until the flour is all absorbed.  Switch to the dough hook and mix on medium speed for 5 to 7 minutes, or as long as it takes to create a smooth, sticky dough.

If mixing by hand:  With a large metal spoon, stir in the oil and the cold water until the flour is all absorbed.  Repeatedly dip one of your hands or the metal spoon into cold water and use it, much like a dough hook, to work the dough vigorously into a smooth mass while rotating the bowl in a circular motion with the other hand.   Do this for 5 to 7 minutes or until the dough is smooth and the ingredients are evenly distributed.

The dough should clear the sides of the bowl but stick to the bottom of the bowl. If the dough is too wet and doesn't come off the sides of the bowl, sprinkle in some more flour just until it clears the sides. If it clears the bottom of the bowl, dribble in a tea- spoon or two of cold water. The finished dough will be springy, elastic, and sticky, not just tacky, and register 50 to 55F.

Sprinkle flour on the counter and transfer the dough to the counter. Cut the dough into 3 equal pieces  for large size pizza.  Lift each piece and gently round it into a ball.  Mist the dough generously with spray oil and slip into a food-grade plastic bag.  Refrigerate the dough for several hours to allow it to rest.  You can keep in the refrigerator for up to 3 days or in the freezer for up to 3 months.

When you’re ready to make the pizza, remove the desired number of dough balls from the refrigerator 2 hours before making the pizza. Before letting the dough rest at room temperature for 2 hours, dust the counter with flour, and then mist the counter with spray oil.

Make the pizzas one at a time. Dip your hands, including the backs of your hands and knuckles, in flour. Very gently lay the dough across your fists and carefully stretch it by bouncing the dough in a circular motion on your hands, carefully giving it a little stretch with each bounce. If it begins to stick to your hands, lay it down on the floured counter and reflour your hands, then continue shaping it.

When the dough is stretched out to your satisfaction (about 9 to 12 inches in diameter for a 6-ounce piece of dough), lay it on the pan, making sure there is enough semolina flour or cornmeal to allow it to slide.

Lightly top it with sauce and then with your other top- pings, remembering that the best pizzas are topped with a less-is-more philosophy


Loaded Mashed Potato Pizza

1/2 Pound Of Bacon
1 (14 Ounce) Ball Pizza Dough
2 Cup Prepared Mashed Potatoes
1 Cup Shredded Cheddar Cheese
Chives
1/4 Cup Sour Cream, For Topping

Preheat the oven to 350 degrees F.  Cook bacon in a large deep skillet over medium heat until crisp. Drain, crumble and set aside.

Spread the pizza dough out on a lightly greased baking sheet. Spread mashed potatoes over the dough, leaving a small crust around the outside if you want. Sprinkle the cheese and bacon evenly over the potatoes.


Bake the pizza in the preheated oven until the cheese is melted and bubbly, about 20 minutes.


Remove the pizza from the oven and transfer to a cutting board. Wait 3 to 5 minutes before slicing and serving, to allow the cheese to set slightly. Then slice into wedges and top each one with a small dollop of sour cream.

Senin, 28 Maret 2011

Angry Birds: The Movie (Trailer)

Pease porridge hot


Pease porridge hot, pease porridge cold
Pease porridge in a pot, nine days old.
Some like it hot, some like it cold.
Some like it in the pot, nine days old.


Have you ever wondered what ‘pease porridge’ is?  I did . . . hence the blog post.

Pease porridge is much like what we know as split pea soup.  I like split pea soup . . . but nine day old soup?  Hmmm . . . I’m dubious about that.

Apparently some people like it nine days old; the nursery rhyme says so. 


Like split pea soup, pease porridge starts out as dried peas(e) in a pot of water with spices.  If vegetables or meat were on hand then those would go into the kettle, as well.

Dried peas are nutritious, inexpensive, easy to store, and easy to cook.  All you need is water, a sprinkle of salt, a cooking vessel kettle, a heat source, and something to stir with.

At night, the kettle would be left hanging over the dying fire.  In the morning, the pease porridge was breakfast . . . cold.  More water, vegetables and meat (if they were lucky) would be added to stretch it out for the next meal and then the next and so on and so forth.  This would go on until the porridge was gone.  Would it last nine days? It’s conceivable.  Waste not, want not.    

I know what you’re thinking . . . food sitting out in the open for days on end is going to spoil.  It makes sense that they would stretch out what little food they had for as long as possible. And what would kill you or I would be tolerated by someone who was used to eating less than fresh food.  I think it’s entirely possible that people living in dire times, on the edge of starvation would build up an exposure-based resistance to food borne pathogens.  And, reheating the food would kill off most bacteria. 


Slow Cooker Split Pea Soup Recipe

  • 1 (16 Oz.) Pkg. Dried Green Split Peas, Rinsed
  • 2 Ham Hocks
  • 3 Carrots, Peeled and chopped
  • 1/2 Cup Chopped Onion
  • 2 Ribs of Celery, Chopped
  • 1 Or 2 Cloves of Garlic, Minced
  • 1 Bay Leaf
  • 2 Teaspoons Dried Parsley Flakes
  • 1 Tbsp. Seasoned Salt
  • 1/2 Tsp. Fresh Pepper
  • 1 1/2 Qts. Hot Water


Layer ingredients in slow cooker in the order given; 

Pour in water, do not stir ingredients. 

Cover and cook on HIGH 4 to 5 hours or on low 8 to 10 hours until peas are very soft and ham falls off bone. 

Remove bones and bay leaf. Mash peas to thicken more, if desired. 

Freezes well.

Sabtu, 26 Maret 2011

It's better to be a lion for a day than a sheep all your life.


When you look at a fluffy, wooly sheep what do you think of (besides how cute and fuzzy it is)?  Mutton?  Lamb chops?  Sweaters and socks?

All good stuff . . . but someone way way WAY back when looked at a sheep and thought, “hmmm, I sure wish I had a warm coat like that”.  He probably skinned the poor, yummy creature, roasted it on a spit and wrapped himself in the cozy fleece. 

There’s no doubt about it, sheep wool is dadburn warm!  The kinky fibers are loaded with air pockets that create outstanding insulation.    The fibers are also very absorbent.  Wool very slowly absorbs moisture from the air allowing body temperature to warm the moistened material. Wool is slow to feel damp, and it dries just as slowly; which means it does not chill the wearer as the moisture evaporates.

One of the earliest fabrics made from wool is felt.  Felting creates a strong, sturdy material and requires no skill.


All you need is heat, moisture and friction.  Heat and moisture cause the outer scales along the fiber to open like barbs on a fishhook.  An alkaline like soap allows the fibers to slide easily over one another thereby causing them to become more easily entangled.   The fibers permanently bind to one another and felting is not reversible.

That’s why you don’t put a natural wool garment in the washing machine, unless you want a new outfit for your Barbie-doll.

The result is a thick, matted fabric that can be cut without fraying.


My husband pointed out some bars of soap that had felting over them at a local store.   Soap and a washcloth all in one!  Hmmm . . . I thought . . . what a clever idea.  I can do that!  And so I did!


Felted Soap


Wrap wool around the bar of soap lengthwise and longwise so that all the surfaces are covered.

Begin wetting the bar of soap by dribbling the hot water on it.  Just a little at a time, trickle water on the wool and pat it to get it wet all the way through.  Don’t dunk it or the wool will slide off.

When the wool is wet through, squeeze it and drip water on it periodically.  You will notice that the wool will start to make a wrinkly skin around the bar of soap.

Keep squeezing it, shifting it around in your hands as you do so.  It will start to lather up.  Keep adding water to keep it lathered. The wool will start felting and lose the wrinkles.

Your can rub your hands over the surface of the bar now, and the wool won't slip off.  It should be very sudsy.

Continue to rub it, turn it and squeeze it in your hands; making sure to rub all the sides. 

Dunk it in the dish of water to see if it has felted down to make a fairly snug casing around the bar of soap.  If it still seems a little fluffy, rub some more.

When it is snug around the bar of soap, run it under cold water, to tighten up the wool, and to rinse off more of the suds.  Gently squeeze out the excess water and pat dry on a towel.


Allow to dry and you have a lovely bar of felted soap . . . soap with it’s own cloth wrapped around it . . . how cool is that?