
I used to make snow forts in the enormous drifts of snow . . . well; they were huge from the perspective of a little kid. I’d make and collect snowballs and stash them then hide in wait for unsuspecting quarry to come along . . . i.e. my evil older sister. To this day, I sometimes forget that there are consequences to fun inspired stupidity, just ask my husband. :-)~

We lived on a mountain and at the edge of our back yard was a defunct ski hill that had used an old pickup truck motor to run the T-bar ski lift. Needless to say, this was the most awesomest sledding hill . . . EVER! Getting back to the top wasn’t so awesome but that’s the price you pay for awesomeness. I would sled all day long on my little disc sled; flying down the hill, catching air on the bumps and slamming into unsuspecting trees. Totally awesome.

And I remember making snow angels; whole armies of them. You can never have enough angels. Maybe that’s why they called me “ding-a-ling” . . . you know the line “Teacher says, every time a bell rings an angel gets his wings”. Get it? Ding-a-ling . . . bell . . . oh, never mind!
Anyhoo . . . snow is very cool . . . literally and figuratively. :)

When combined, windblown snow and black dirt make what is called snirt.
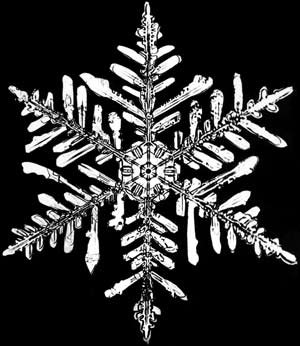
We’ve all heard that there are no two snowflakes alike. That’s not necessarily true. There is the possibility, however unlikely, that given the correct environmental conditions . . . humidity, temperature, etc . . . that twin snowflakes could occur. Although, it is more likely that two snowflakes could become virtually identical.
Snowflakes start out as a simple hexagonal prism before they sprout branches to form a more complex shape. Matching snow crystals were discovered in Wisconsin
All snowflakes have six sides. The hexagonal symmetry of snowflakes is fascinating. A snowflake starts out as a flat ice surface that grows in the air. Small bumps form on the flat surface. Ice crystals in the air attach to the bump before they can reach the original surface. As more molecules reach the bump the bump grows and develops branches and then side-branches. The conditions surrounding the snow crystal are nearly identical, which is why the branches grow at approximately the same rate and why they tend to look alike.
It takes over 1000 water molecules to make up a single snowflake.

From prisms to needles, there are many different types of snowflakes
- Stellar Plates: Thin, plate-like crystals with six broad arms that form a star-like shape.
- Stellar Dendrites: Plate-like snow crystals that have tree-like branches and side-branches. This type of snowflake is often used as the shape for holiday decorations.
- Needles: Slender, columnar ice crystals that grow when the temperature is around 23 degrees F. They appear like tiny white hairs when they land on your clothing.
- Rimed
- Fern-Like Stellar Dendrites: Similar to stellar dendrites, but with so many branches that they take on a fern-like appearance. These snowflakes are the largest ones out there, with diameters of 5 mm or more.
The largest snowflake ever recorded, according to the Guinness World Records, was 15 inches wide and 8 inches thick. A man named Matt Coleman observed the snowflake in 1887 at Fort Keogh , Montana

Now that you are somewhat more informed about my childhood . . . and snowflakes . . . let’s take another trek down memory lane and make some snowflakes of our own. All you need is some paper and a pair of scissors. It’s fun and interesting to see the different shapes you can get out of little square of paper.
I used the ones I made as decorations for wrapped packages and as the tree topper for my Charlie Brown Christmas tree.
I used the ones I made as decorations for wrapped packages and as the tree topper for my Charlie Brown Christmas tree.

First and most importantly you must start out with a square.

There are two methods that I know . . . the first one is to start by folding the square into a rectangle.

Then fold the rectangle in half and open it back up so that you have a crease in the center.

Fold the left half of the bottom edge up at a 60-degree angle.

Then fold the right half of the bottom edge up diagonally at a 60-degree angle

The two folded sections will overlap overlap at the center of the piece.


Cut the base at an angle . . . this where the creativity kicks in.
 Cut designs along the left and right folds to create the design of your snowflake. You can even reshape the top edge of the folded piece to give the ends of your snowflake's arms a different style. Don't cut all the way across the top of the piece from one side to the other; cut only along the top curved edge or you will remove a chunk from your snowflake.
Unfold the paper to reveal your snowflake.

The second method is to fold your square into a triangle.

Then fold the triangle in half and open it back up so that you have a crease in the center.

Then fold the right half of the bottom edge up diagonally

The two folded sections will overlap overlap at the center of the piece.

Cut the base at an angle or arc or whatever


Tidak ada komentar:
Posting Komentar