Tampilkan postingan dengan label personal hygiene. Tampilkan semua postingan

Sabtu, 08 Oktober 2011

You know us crazy kids. We'll do anything crazy to our hair.

I have awesome hair. I know this because  . . . wellmore on that later . . .   

I’ve only recently started growing my hair long.  As a child my mother didn’t let me grow itbecause grooming wasn’t exactly my strong suit. So, if I wasn’t going to take care of it then I couldn’t have it.

As I got older and more inclined to primp and preen I stilldidn’t let it grow beyond my shoulders.


Until I met my (now) hubby. Early on in our relationship it became apparent that he likes longhair.  So, I let it grow.

It’s taken some time but my hair has gotten fairly long . .. a little more than halfway down my back. 

Anyhoo . . . I know I have awesome hair because I washanging out with some friends, chatting and whatnot when someone came up behindme and started playing with my hair . . . running his hands through it andstroking it.  At first, I thought it washubby . . . it wasn’t.  It was a littlecreepy even though I know the guy.  He waslike, “you have really nice hair”, and continued to stroke it.   So, Isaid . . . “I haven’t shampooed my hair in over six months, you know”

Really, I haven’t. 

It started out as an experiment.  I liked the results so much that I’veincorporated it into my regular grooming. No-pooing is healthy, inexpensive and my hair has never looked better orhealthier.

My regime is to wash my hair with a tablespoon or so ofbaking soda dissolved into a couple cups of warm water.  I pour it on the roots and work it through tothe ends then rinse it out.  Baking sodaremoves excess oil, debris and quite effectively eliminates odors.

I mention the odor removing properties because I work as abartender part-time.  I work in a privateclub that allows smoking . . . including cigars. So after working my hair oftenreeks of smoke.  The baking soda washcompletely neutralizes the smoky smell.  Itquite impressive.

Because baking soda leaves my hair unmanageable if I don’tfollow up with a rinse.  So after washingI apply a rinse of either cider vinegar and water or lemon juice and water;which are both acids withi effectively counteracts the alkalinity of the bakingsoda.  The rinse leaves my hair tanglefree, soft and glossy.  Believe it or notthe vinegar smell completely rinses away and leaves my hair smelling like . . .well . . . hair.   No perfumes, nochemicals . . . just clean, fresh hair.

Anyhoo . . . my hair is awesome . . . just sayin’.

Sabtu, 11 Juni 2011

If we're lucky, there will be beer there

My husband shared an article with me on alternate uses for beer.  I know he was trying to help me with blog content but I’m still surprised.  As far as he’s concerned any use for beer, other than drinking it, is considered alcohol abuse.  


A lot of the alternative uses call for left over flat beer.  Left over beer??  I’m not sure I know what that is or how it’s even possible.


Some of the uses I was familiar with . . . and others were unexpected.  I use beer for cooking . . . chili, bread, soup, etc.  But I wasn't aware that beer works as a meat tenderize (let it marinate for at least an hour or overnight in the fridge) . . . I going to have to try that one. 

I’ve heard of it being used as pest control.  After all . . . who can resist beer?  Make a beer trap for bees by putting beer in an old jar and punch holes in the lid . . . the bees will be able to get in the jar but not out.  To distract and terminate garden pests like sligs and earwigs . . . bury a can just up to its lip in the garden and fill the can with beer; they’ll fall in and get caught. Just make sure you check the trap daily, emptying it and refilling it with new beer.  


To trap fruit flies . . . I hate those little buggers!  Put some beer in a cup; cut the corner off of a sandwich bag and place the cut corner in the cup; folding the rest around the cup and securing with a rubber band.


To enrich soil and help grass to grow?  One of the uses was to add  few tablespoons of flat beer to the soil. Plants absorb nutrients, sugar and energy from the beer and help them grow.  Interesting.


As hair therapy?  This one I’ve heard of but never tried . . . until now.  Beer is credited with adding bounce, shine and vitality to hair.  The sugars in beer are supposed to add shine and the proteins from the malt and hops found in beer coat, rebuild and repair damaged hair. 

Choose a beer that does not have a strong odor. Shampoo and rinse hair as usual . . . then pour the flat, warm beer on your hair and work it through. Rinse with lukewarm, not hot, water.


The beer rinse was something easy enough to try.  I left a beer out overnight to de-fizz it . . . shhhh, don't tell my husband.  I used a baking soda wash with apple cider vinegar rinse.  Then a second rinse with the beer.  My analysis, my hair doesn't seem to have more body or bounce but it is clearly shiny as hell and looks pretty darn healthy.   It doesn't smell like beer . . . which I'm not so sure wouldn't be a bad thing . .. rowr! My hair was manageable and blow dried smooth and soft with absolutely no additional products used.  


Sabtu, 04 Juni 2011

Those curious locks so aptly twin'd, Whose every hair a soul doth bind.

I'm always interested in finding alternative ways of doing things.  For the purposes of this blog, I try stuff out so that I can offer first hand information on my experience .  .  . you know, so that I actually have some sort of clue as to what I'm talking about.

I decided that I wanted to find a natural approach to coloring my hair.  I only have a few grays, so the only reason I typically color my hair is to cover them . . . yanking them out hurts!  So, after some research I opted to try henna.  

Henna . . . true henna is red and red only.  I don't want red hair.  I simply want to cover those silly strands of elderly hairs and maintain a brownish hue.  So, why did I pick henna?  Because, there are other color options for 'henna' hair dyes but they are not . . . uh . . . henna.  Let me explain.

There are three different plant types that are used for hair coloring because of the natural dyes they contain.  They all come as green powders but each has a distinctively different resulting color.

Neutral henna, is not exactly neutral and it is not henna.  It is Cassia obovata has a golden dye molecule that will stain dull blonde and gray hair yellow.  It will help damaged hair, make hair full, glossy, healthy.
 
Red henna, true henna, is Lawsonia inermis, commonly known as henna.  The leaves of the henna plant have a red-orange dye molecule.  Like I said before, henna will stain your hair red-orange; but the stain is translucent and will combine with your natural color.  Henna will make your hair heavy, thick and silky.

Black henna is neither black nor henna. It is indigo, Indigofera tinctoria.  And, obviously, it will color your hair black.

Like most gentlemen . . . and I use that term loosely . . . my husband prefers blonds.  Needless to say he was not thrilled with my choice of dye hair dye.  He’s not a fan of red heads. 

Henna will not . . . I repeat . . . NOT lighten your hair.  It only stains your hair.  It is also not truly a permanent color.  Shampooing, the environment and the chlorine in water all will degrade the color to some degree.  And, because henna is a single-compound natural dye it is far less likely to go brassy or bronze like synthetic dyes.

So, here’s where you get to benefit from my experience. 

I choose neutral henna because I wanted to minimize the red factor.  This is irrelevant to the outcome but neutral henna is supposes to smell like fresh mowed grass.  I like that smell . . . it’s so summery.  Except that *I* happen to think it smells like spinach . . . good to eat but not so nice on my head. 

I followed the package instructions for preparing the dye and applied to my hair as per the directions.  Henna is messy, messy, messy.  I used to be a hairdresser and I’ve been coloring my own hair for years.  Henna is, by far, the sloppiest, goopiest gunk I’ve ever used. 

That being said, you don’t need to be a hair dresser to apply the stuff.  You basically section off your hair and slap it on.  You just need to make sure that you cover your entire head.  And use a drop cloth or towel and, for the love of God, use gloves!

Henna is safe for your hair.  It doesn’t damage your hair, so you can leave it on for minutes or hours.  The depth and intensity of color depends on how long you decide to keep it on. 

Since this was my first try I decided to let it stay in my hair for 30 – 45 minutes.  After my time was up, I hopped in the shower to rinse it out.  And, I can tell you, it doesn’t rinse out easily.  Despite the fact that you where a plastic cap while it sets it still gets kind of stiff and dries out a bit.  So, you need to rinse and rinse and rinse. 

You can shampoo and condition as you normally would.  Now, I mentioned that neutral henna smells like spinach, right?  Well, I’ve been no-pooing for over a month . . . that is I’ve been using baking soda to wash and apple cider vinegar to rinse.  My experience has been that the baking soda wipes out even the strongest odors  . . . including cigar and cigarette smoke.  It didn’t touch the spinach smell.  Thank goodness my hair didn’t smell that way after it was dry.


As I dried my hair I was very surprised at how well it covered up the gray hairs.  None was to be seen.  Very cool!  

It was brownish with red highlights.  It's very pretty . . . but hubby is not thrilled even with the little bit of red.  He'll get over it.


Taken inside


My overall experience was good.  My hair is definitely shiny and thick and has lots of body.  It looks remarkably healthy and lustrous.

I'm a happy girl!


Taken in the sun


Sabtu, 07 Mei 2011

Soap and water and common sense are the best disinfectants


You know why water doesn’t wash away dirt, right?  Well, I’m going to assume you don’t and tell you anyway. 


Water is H2O . . . which, in layman’s terms is, one little bit of oxygen and two tads of hydrogen.   The two hydrogen tads like to hang out with the oxygen bit, the tads are on one side of the molecule and the bit is on the other.  All kinds of chemical mumbo jumbo magical stuff happens which basically just makes water molecules stick together to make . . . well . . . a whole bunch of water. 


Okay, so back to the original question.  The bonded water bits and tads create a pull in every direction - except at the surface. Because the fellas on the surface have no other fellas above them to pull on them, so they are only pulled by the ones underneath them.   This creates surface tension, like a skin . . . water skin as it were, but not a waterskin.


Water strider insects actually skim around on the skin-like surface of ponds and streams . . . they can actually walk on water.  Not because they are godlike but because they have cool little pontooned feet.


Again, back to the original question . . . water can’t wash away dirt  because it mixes in with the oil on your body, and water is simply not attracted to oily things . . . as you know,  oil and water do not mix.


Soap changes everything.  Soap molecules are shaped kind of like caterpillars.  The head of the caterpillar likes to chill in the water and the tail end like to wallow in the oil.    When you add soap to water, the soap molecules near the surface squeeze between the surface molecules of the water and all stand on their water-loving heads with their water-hating tails in the air, breaking up the surface tension.


Soap bubbles last longer than plain water bubbles because there is too much surface tension in water for it to remain in a bubble. In a soap bubble, the tails of the soap molecules are on the outside of the bubble, which also protects it from evaporation. If you want to see how long you can keep a soap bubble, try putting it in a jar. One bubble lover kept a bubble for 341 days this way.


So there you have it . . . the reason water alone does not do the job is that we are oily. What dirt attaches itself to us is embedded in this oil, and it repels water. Until we reach for that bar of soap.


Cranberry Apple Tea Soap
  
  • 16 Ounces Lard
  • 1 Ounce Honey Added At Trace
  • 1 Tsp Cinnamon Added At Trace
  • 2.3 Ounces Lye
  • 7 Ounces Ice Cold Or Part Frozen Brewed Cranberry Apple Zinger Tea


Remember that when you’re making your own soap that you should have a dedicated set of equipment set aside just for this process.  

This recipe is for a  I’m going to be making cold process soap.  The basic tools required are:

A Large Pot . . . Enamel or cast iron do very well for this.
A Large Wooden Or Plastic Spoon
A Hand Mixer (Optional)
A Large Baking Pan Or Shallow Cardboard Box

Put the ice cold tea into a 1 quart bowl. Using the stirring spoon (known to soap makers as the "crutch"), pour lye slowly into the tea, stirring until the lye is all dissolved. Remember that lye is very caustic and will burn your skin and eyes! Any splatters must be washed off immediately with lots of water!
Cranberry Apple Tea
After Lye is added


After Lye is dissolved
 Cover the solution to keep out air and allow to cool (or warm up) to about 85 degrees F.  No need to apply heat – heat will be chemically produced when the lye comes in contact with the liquid


 Melt the fat in the 4-6 quart bowl or pot. Don't use aluminum or galvanized bowls!  When the fat is melted, cool it down to 95 degrees F. Prepare the box with a plastic trash bag lining, so the fresh liquid soap can't leak out.

When all is ready, begin to stir the liquid fat in a clockwise direction while pouring the lye mixture into it in a thin steam (pencil size or thinner) until it is all added. Crutch (stir) the mix vigorously, using “S” pattern or use a hand blender alternating with a circular pattern until the mix begins to cool and thicken.  At this point do NOT stop or the mix may separate!
  
First the soap will be murky, then creamy, then like heavy cream and finally, like hot cooked pudding and will show traces when you dribble a stream from the crutch onto the surface. This process can take from 10 minutes to 45 minutes, depending on the temperature, weather and purity of your ingredients. Stir vigorously but patiently! With hand blender stir time is cut to 1/10 of the regular time.

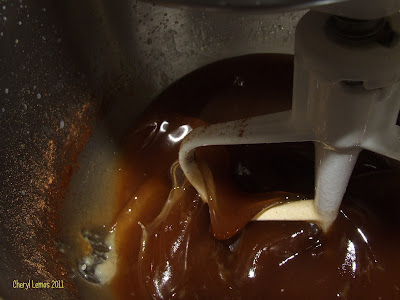
I've found that using my old Kitchen-aid Classic is the perfect tool for stirring my batches of soap.  Although i am constantly monitoring the mixing process, the stand mixer lets me be a little more hands off and I can be doing other things around the kitchen while the soap is mixing and cooling.

When your "trace" does not sink back into the surface, the soap is ready to pour into the lined box. Wear rubber gloves and treat the raw soap like you treated the lye water. Wash off all splatters immediately. Have 10% vinegar and water and a sponge to neutralize splatters.

After 3-5 hours the soap may be cut into bars with a table knife, NOT a sharp knife. Allow the soap to cure in the box for about a week before breaking it up and handling it, and another month before using it.
  
In a week remove the soap and break apart.  Let them cure for at least a month before using. 


If you are interested in some perfectly wonderful hand crafted soap but don't want to go through the process of making it . . . Soaps by Judy is a fantastic source.  She's a personal friend of mine and a great lady and she makes the most amazing soaps!  Check out her website and look her up on Facebook.